React による WebRTC-SIP の再構築 ①ログイン処理
どうも,筆者です.
以前,JsSIP による WebRTC-SIP 環境を構築し,WebPhone を構築した. ただ,jQuery を用いていたため,変更箇所が多く,各コンポーネントの関係が複雑になっていた.
そこで,React を使って,コンポーネントベースでページを作成し,同等の機能を実現することとした.
workspacememory.hatenablog.com
制約
筆者は,React を学習し始めた初心者のため,実装が怪しい部分があり,取り敢えず動いた状態になる可能性が高い. また,今回は JsSIP によるイベント駆動のアプリケーションとの組み合わせになるため,標準的な SPA (Single Page Application) とは勝手が違う可能性もある. この辺は,今後改善していく方針とさせていただきたい.
ちなみに,筆者は,React のチュートリアルを読んで,その中で説明されている〇×ゲームのサンプルを写経した程度の準備だけしている.他の知識に関しては,都度調べながら実装している.
Docker 環境の更新
以前,React を動作させるため,Docker 環境を構築した.まずは,こちらの環境に手を加えていく.
workspacememory.hatenablog.com
docker-compose.yml
docker-compose.yml を以下のように更新した.
version: '3.4'

x-logging:
  &json-logging
  driver: json-file
  options:
    max-size: "10m"
    max-file: "3"

services:
  frontend:
    build:
      context: ./frontend
      dockerfile: Dockerfile
      args:
        TZ: "Asia/Tokyo"
    image: frontend.react
    working_dir: /home/node/app
    restart: always
    container_name: frontend-react
    volumes:
      - ./frontend/public:/home/node/app/public
      - ./frontend/src:/home/node/app/src
      - ./.env:/home/node/app/.env:ro
    ports:
      - 8888:3000
    logging: *json-logging
Dockerfile
Dockerfile を以下のように更新した.
FROM node:16-alpine3.11
ARG TZ="Asia/Tokyo"

ENV NODE_UID=1000 \
    NODE_GID=1000

# install basic software
RUN    apk update \
    && apk add --no-cache bash tzdata shadow su-exec tini \
    && cp /usr/share/zoneinfo/${TZ} /etc/localtime \
    && rm -rf /home/node/app \
    && rm -rf /root/.cache /var/cache/apk/*

COPY entrypoint.sh /usr/local/bin/entrypoint.sh
RUN chmod +x /usr/local/bin/entrypoint.sh

USER node
RUN    cd /home/node \
    && echo -e "y\n" | npx create-react-app app -timeout=60000 \
    && cd app \
    && npm install react-bootstrap bootstrap@4.6.0 jssip
USER root

WORKDIR /home/node/app

ENTRYPOINT [ "/usr/local/bin/entrypoint.sh" ]
CMD [ "npm", "start" ]
entrypoint.sh
entrypoint.sh を以下のように更新した.
#!/bin/bash

# get node user information
uid=$(id node -u)
gid=$(id node -g)

# change GID
if [ ${NODE_GID} -ne ${gid} ]; then
    groupmod -g ${NODE_GID} node
fi
# change UID
if [ ${NODE_UID} -ne ${uid} ]; then
    usermod -u ${NODE_UID} node
fi

# update owner
chown node:node package.json package-lock.json
# execute process by node user
exec su-exec node /sbin/tini -e 143 -- "$@"
ディレクトリ階層
ディレクトリ構造を以下のように更新した.また,デフォルトで含まれていたファイルのいくつかを削除した.
.
│  docker-compose.yml
│  README.md
│  sample.env
│
└─frontend
    │  Dockerfile
    │  entrypoint.sh
    │
    ├─public
    │      favicon.ico
    │      index.html
    │      manifest.json
    │      robots.txt
    │
    └─src
            App.js
            App.test.js
            index.js
            reportWebVitals.js
            setupTests.js
ここで,sample.evn は,React 内で用いる環境変数を設定している.実際に利用する際は,.env としてファイルを作成し,sample.env と同じ階層に配置して利用する(docker-compose.yml の volume 参照).
sample.env の構成を以下に示す.
WDS_SOCKET_PORT=0
REACT_APP_DEV_SERVER_NAME=sample.example.com
REACT_APP_DEV_SIP_PORT=12345
REACT_APP_DEV_WEBSOCKET_PORT=8443
REACT_APP_DEV_BASE_URL=https://www.example.com

REACT_APP_TEST_SERVER_NAME=
REACT_APP_TEST_SIP_PORT=
REACT_APP_TEST_WEBSOCKET_PORT=
REACT_APP_TEST_BASE_URL=

REACT_APP_PRODUCTION_SERVER_NAME=
REACT_APP_PRODUCTION_SIP_PORT=
REACT_APP_PRODUCTION_WEBSOCKET_PORT=
REACT_APP_PRODUCTION_BASE_URL=
画面設計
以前の WebPhone で画面設計ができているが,React で実装する際に構築する画面構成を整理しておく.
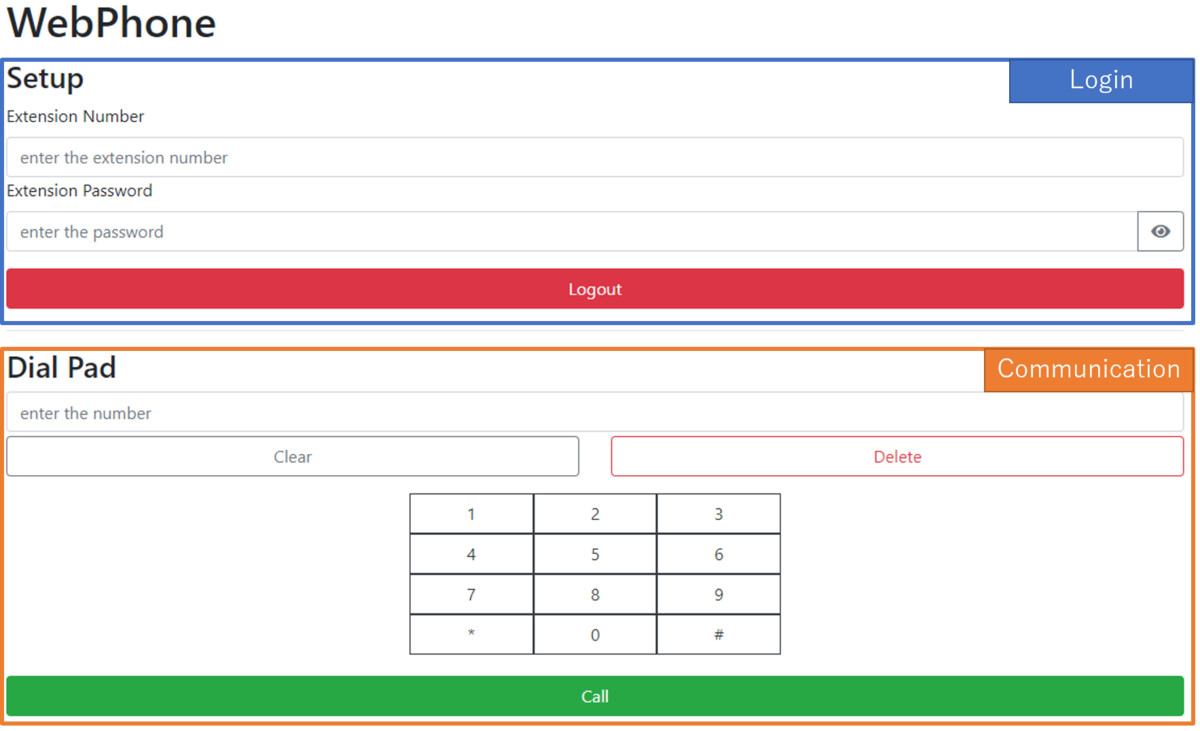
上記のように,Login 部分と Communication 部分に分けて実装予定である.このうち,今回は,Login 部分を実装する.
React によるログイン処理の実装
さっそく作り込んでいく.最終的なディレクトリ構成と各コードの内容を示していく.
ディレクトリ構成
コンポーネントと WebPhone 本体を分けて管理した.
.
│  docker-compose.yml
│  README.md
│  sample.env
│
└─frontend
    │  Dockerfile
    │  entrypoint.sh
    │
    ├─public
    │      favicon.ico
    │      index.html
    │      manifest.json
    │      robots.txt
    │
    └─src
        │  App.js
        │  App.test.js
        │  index.js
        │  reportWebVitals.js
        │  setupTests.js
        │
        ├─components
        │      ErrorMessage.js
        │      Login.js
        │
        └─services
                config.js
                WebPhone.js
public/index.html
ページを表示する上で,最低限の設定が必要になる.ここでは,bootstrap を用いるので,css など必要なデータを読み込む処理も加え,html を作成している. 必要な部分は React で実装していくので,生の html をほとんど書かないというのはありがたい.
<!DOCTYPE html>
<html lang="ja">
  <head>
    <meta charset="utf-8">
    <link rel="icon" href="%PUBLIC_URL%/favicon.ico" />
    <meta name="viewport" content="width=device-width, initial-scale=1" />
    <meta name="theme-color" content="#000000" />
    <meta name="description" content="Web Phone">
    <link rel="manifest" href="%PUBLIC_URL%/manifest.json" />
    <link rel="stylesheet" href="https://cdn.jsdelivr.net/npm/bootstrap@4.6.0/dist/css/bootstrap.min.css"
          integrity="sha384-B0vP5xmATw1+K9KRQjQERJvTumQW0nPEzvF6L/Z6nronJ3oUOFUFpCjEUQouq2+l" crossorigin="anonymous" />
    <link rel="stylesheet" href="https://use.fontawesome.com/releases/v5.8.2/css/all.css"
          integrity="sha384-oS3vJWv+0UjzBfQzYUhtDYW+Pj2yciDJxpsK1OYPAYjqT085Qq/1cq5FLXAZQ7Ay" crossorigin="anonymous">
    <title>Web Phone</title>
  </head>
  <body>
    <div id="root"></div>
  </body>
</html>
src/App.js
ページの雛形となる部分である.今回は,JsSIP のログイン状態により,Communication の表示と非表示,Login ボタンのクラス設定を変更したいため,App.js でログイン状態を保持することとする. このように,ログイン状態を Login のコンポーネントに渡すことで,各コンポーネントの更新を委譲できると考えた(あっているのかなぁ...).
import React from 'react';
import { Container, Row, Col } from 'react-bootstrap';
import ErrorMessage from './components/ErrorMessage.js';
import Login from './components/Login.js';
import webPhone from './services/WebPhone.js';

class App extends React.Component {
  constructor(props) {
    super(props);
    this.state = {
      loggedIn: false,
      isLogoutProcess: false,
      error: [],
    };

    // define callback functions
    const updateLoginStatus = (isEnable, err) => {
      const message = err ? [err] : [];

      this.setState({
        loggedIn: isEnable,
        isLogoutProcess: false,
        error: message,
      });
    };
    this.registered = (isEnable) => {
      updateLoginStatus(isEnable);
    };
    this.registrationFailed = (err, isEnable) => {
      updateLoginStatus(isEnable, err);
    };
    this.logout = () => {
      this.setState({
        isLogoutProcess: true,
      });
      setTimeout(() => {
        updateLoginStatus(false);
      }, 3*1000);
    };
  }

  componentDidMount() {
    webPhone.on('registered', this.registered);
    webPhone.on('registrationFailed', this.registrationFailed);
    webPhone.on('logout', this.logout);
  }

  componentWillUnmount() {
    webPhone.off('registered', this.registered);
    webPhone.off('registrationFailed', this.registrationFailed);
    webPhone.off('logout', this.logout);
  }

  render() {
    const loggedIn = this.state.loggedIn;
    const isLogoutProcess = this.state.isLogoutProcess;
    const error = this.state.error;

    return (
      <Container>
        <Row>
          <Col>
            <h1>WebPhone</h1>
          </Col>
        </Row>
        <Login loggedIn={loggedIn} isLogoutProcess={isLogoutProcess} />
        <Row>
          <Col>
            <ErrorMessage message={error} />
            <hr />
          </Col>
        </Row>
      </Container>
    );
  }
}

export default App;
src/components/Login.js
ログイン画面に該当する部分である.こちらは,世の中のサンプルを参考に,見よう見まねで作っている.ただ,Login ボタンの class 設定「btn-block」を有効にする方法が分からなかった.ここでは,className="btn-block" として挿入している.
import React from 'react';
import { Row, Col, Button, Form, FormControl } from 'react-bootstrap';
import ErrorMessage from './ErrorMessage.js';
import webPhone from '../services/WebPhone.js';

class PasswordField extends React.Component {
    constructor(props) {
        super(props);
        this.state = {
            isVisible: false,
            type: 'password',
        };
    }

    handleClick() {
        const isVisible = this.state.isVisible;

        this.setState({
            isVisible: !isVisible,
            type: !isVisible ? 'text' : 'password',
        });
    }

    render() {
        const style = {
            left: 'auto',
            position: 'absolute',
            right: '25px',
            top: '40px',
        };
        const disabled = this.props.disabled;
        const type = disabled ? 'password' : this.state.type;
        const visibleType = (disabled || !this.state.isVisible) ? 'fas fa-eye' : 'fas fa-eye-slash';

        return (
            <div>
                <FormControl
                    type={type}
                    name="password"
                    placeholder="enter the password"
                    onChange={(event) => this.props.onChange(event)}
                    disabled={disabled}
                />
                <span onClick={() => this.handleClick()} style={style}>
                    <i className={visibleType} />
                </span>
            </div>
        );
    }
}

class Login extends React.Component {
    constructor(props) {
        super(props);
        this.state = {
            username: '',
            password: '',
            errors: {
                username: [],
                password: [],
            },
        };
    }

    handleChange(event, converter=(val)=>val) {
        this.setState({ [event.target.name]: converter(event.target.value) });
    }

    handleClick(loggedIn) {
        const validator = (target, message) => !target ? [message] : null;
        const {username, password} = this.state;
        this.setState({
            errors: {
                username: [],
                password: [],
            },
        });

        if (this.props.loggedIn) {
            webPhone.logout();
        }
        else {
            const invalidUsername = validator(username, 'Enter the username');
            const invalidPassword = validator(password, 'Enter the password');

            if (invalidUsername || invalidPassword) {
                this.setState({
                    errors: {
                        username: invalidUsername,
                        password: invalidPassword,
                    },
                });

                return;
            }
            webPhone.login(username, password);
        }
    }

    render() {
        const loggedIn = this.props.loggedIn;
        const isLogoutProcess = this.props.isLogoutProcess;
        const text = loggedIn ? 'Logout' : 'Login';
        const variant = loggedIn ? 'danger' : 'primary';
        const errors = this.state.errors;

        return (
            <Row className="justify-content-center">
                <Col>
                    <Row>
                        <Col>
                        <h3>Setup</h3>
                        </Col>
                    </Row>
                    <Row className="mt-1">
                        <Col>
                            <Form.Label>Extension Number</Form.Label>
                            <FormControl
                                type="tel"
                                name="username"
                                placeholder="enter the extension number"
                                value={this.state.username}
                                onChange={(event) => this.handleChange(event, (val) => val.replace(/[^0-9*#]/g, ''))}
                                disabled={loggedIn}
                            />
                            <ErrorMessage message={errors.username} />
                        </Col>
                    </Row>
                    <Row className="mt-1">
                        <Col>
                            <Form.Label>Extension Password</Form.Label>
                            <PasswordField
                                onChange={(event) => this.handleChange(event)}
                                disabled={loggedIn}
                            />
                            <ErrorMessage message={errors.password} />
                        </Col>
                    </Row>
                    <Row className="mt-1">
                        <Col>
                            <Button variant={variant} className="btn-block" onClick={() => this.handleClick()} disabled={isLogoutProcess}>{text}</Button>
                        </Col>
                    </Row>
                </Col>
            </Row>
        );
    }
}

export default Login;
src/components/ErrorMessage.js
これまでは,エラーメッセージの表示を alert で実装していた.画面内に組み込みたかったので,世の中の記事を参考に実装した.
import React from 'react';

const ErrorMessage = (props) => {
    const errorStyle = {
      color: '#fc0101',
    };
    const messages = props.message;

    return (
      <React.Fragment>
        {(messages !== null) && messages.map((message) =>
          <p style={errorStyle} key={message}>
            {message}
          </p>
        )}
      </React.Fragment>
    );
};

export default ErrorMessage;
src/services/config.js
以前は,html 内にサーバの情報などをハードコーディングしていた.これは改善したかった点の 1 つなので,今回は環境変数を用いることで回避する.
create-react-app コマンドで生成した場合,REACT_APP_ という prefix を付ければ,自動的に環境変数を読み込んでくれるらしい.これを利用し,環境変数を読み込む.
const Config = () => {
    const env = process.env;
    let ret;

    if (env.NODE_ENV === 'test') {
        // test
        ret = {
            serverName: env.REACT_APP_TEST_SERVER_NAME,
            sipPort: env.REACT_APP_TEST_SIP_PORT,
            websocketPort: env.REACT_APP_TEST_WEBSOCKET_PORT,
            baseUrl: env.REACT_APP_TEST_BASE_URL,
        };
    }
    else if (env.NODE_ENV === 'production') {
        // production
        ret = {
            serverName: env.REACT_APP_PRODUCTION_SERVER_NAME,
            sipPort: env.REACT_APP_PRODUCTION_SIP_PORT,
            websocketPort: env.REACT_APP_PRODUCTION_WEBSOCKET_PORT,
            baseUrl: env.REACT_APP_PRODUCTION_BASE_URL,
        };
    }
    else {
        // development
        ret = {
            serverName: env.REACT_APP_DEV_SERVER_NAME,
            sipPort: env.REACT_APP_DEV_SIP_PORT,
            websocketPort: env.REACT_APP_DEV_WEBSOCKET_PORT,
            baseUrl: env.REACT_APP_DEV_BASE_URL,
        };
    }

    return ret;
}
const reactEnv = Config();

module.exports = reactEnv;
src/services/WebPhone.js
JsSIP を用いる部分の処理である.なるべく jQuery とは分離させていたため,ほぼそのまま利用できている.変更箇所のみを記載する.
import EventEmitter from 'events';
import lodash from 'lodash';
const reactEnv = require('./config.js');
const JsSIP = require('jssip');

class WebPhone extends EventEmitter {
    constructor() {
        super();
        JsSIP.debug.enable('JsSIP:*');
        // Setup server information →環境変数を取得し,設定するように変更
        const SERVER_NAME = reactEnv.serverName;
        const SIP_PORT = reactEnv.sipPort;
        const WEBSOCKET_PORT = reactEnv.websocketPort;
        const baseUrl = reactEnv.baseUrl;
        const socket = new JsSIP.WebSocketInterface(`wss://${SERVER_NAME}:${WEBSOCKET_PORT}/ws`);
        const noAnswerTimeout = 15; // Time (in seconds) after which an incoming call is rejected if not answered
        this.sipUrl = `${SERVER_NAME}:${SIP_PORT}`;
        this.config = {
            sockets: [socket],
            uri: null,
            password: null,
            session_timers: false,
            realm: 'asterisk',
            display_name: null,
            no_answer_timeout: noAnswerTimeout,
        };
        // (中略)
        // this.confirmCall を削除
        // getPhoneParameter と getPhoneStatus を削除
    }

    login(username, password) {
        if (this.phone) {
            return;
        }

        const config = Object.assign(lodash.cloneDeep(this.config), {uri: `sip:${username}@${this.sipUrl}`, password: password, display_name: username});
        this.phone = new JsSIP.UA(config);
        // In the case of user's authentication is success
        this.phone.on('registered', (event) => {
            this.isEnable = true;
            this.emit('registered', this.isEnable);
        });
        // In the case of user's authentication is failed
        this.phone.on('registrationFailed', (event) => {
            const err = `Registering on SIP server failed with error: ${event.cause}`;
            this.logout();
            this.emit('registrationFailed', err, this.isEnable);
        });
        // In the case of firing an incoming or outgoing session/call
        this.phone.on('newRTCSession', (event) => {
            // Reset current session
            const resetSession = () => {
                this.ringTone.pause();
                this.ringTone.currentTime = 0;
                this.session = null;
                this.emit('resetSession');
            };
            // Enable the remote audio
            const addAudioTrack = () => {
                this.session.connection.ontrack = (ev) => {
                    this.ringTone.pause();
                    this.ringTone.currentTime = 0;
                    this.remoteAudio.srcObject = ev.streams[0];
                };
            };

            if (this.session) {
                this.session.terminate();
            }
            this.session = event.session;
            this.session.on('ended', resetSession);
            this.session.on('failed', resetSession);
            this.session.on('peerconnection', addAudioTrack);
            this.session.on('progress', () => this.emit('progress', this.session); // accept を削除し,progress を追加
            this.session.on('confirmed', () => {
                this.ringTone.pause();
                this.emit('confirmed', this.session);
            });

            // Check the direction of this session
            if (this.session._direction === 'incoming') {
                // In the case of incoming
                this.ringTone.play(); // timeout 処理を削除
            }
            else {
                // In the case of outgoing
                addAudioTrack();
            }
            this.emit('changeMuteMode', false);
            // newRTCSession のイベント発火を削除
        });
        this.phone.start();
    }
    logout() {
        if (this.phone) {
            this.phone.stop();
            this.phone = null;
            this.session = null;
            this.lockDtmf = false;
            this.isEnable = false;
            this.emit('logout'); // event を追加
        }
    }
    // (中略)
}

const webPhone = new WebPhone();

export default webPhone;