PowerShell による GUI の自動化
どうも,筆者です.
今回は,Windows に搭載されている PowerShell を利用したスクリプトについて説明する.
経緯
あるソフトウェアで,データを呼び出し,スクショを撮って画像として保存する必要があった.2~3 枚なら手でやろうと思うけれども,200 枚,300 枚もあると流石に自動化したくなる.また,ソフトウェアは,Windows 版の GUI のものしかない.そのため,Windows の GUI を自動化する方法を探すこととなった.
UI Automation
調べたところ,Windows の PowerShell に,「UI Automation」を導入することで GUI の自動化ができるらしい.
早速,http://uiautomation.codeplex.com/ からダウンロードしてきた.保存場所は,「C:\winPowerShell\UIAutomation」というディレクトリを作成し,その中に展開した. そのままでは,PowerShell のスクリプトを書いても実行できないらしい.そのため,管理者権限で「Windows PowerShell ISE」を起動させ,以下のコマンドで実行権限を変える.
Set-ExecutionPolicy RemoteSigned
ちなみに,はてなブログでは,ps1 でコードが PowerShell と認識されるらしい.便利になったものだ.
やりたいこと
さて,実際にコードを書いていくことになる.しかし,普段 GUI で行っている操作をいきなりスクリプトに落とそうとしても無理がある.そのため,色々調べて回った. 調べたところ,先程ダウンロードした UI Automation には,UIAutomationSpy.exe というスクリプトを書く際の補助ツールなるものがあるらしい. このツールを借りて,作業を行う.ここでは,以下のような流れで処理を行う.
- データがあるディレクトリまでの絶対パスと参照するデータ名を設定する.
- 起動させたいソフトウェアを絶対パスで指定し,起動する.
- ソフトウェアから,上記で示したデータを参照し,開く.
- Alt + PrintScreen により,画面をクリップボードに保存する.
- mspaint を実行し,ペイントを起動し,Ctrl + V でクリップボードの画像を貼り付ける.
- Ctrl + S で保存する.この時,新規保存となるので,保存先のパスと保存するファイル名を指定する.
- これをデータの数だけ繰り返す.
スクリプトを書く
実際に調べながらコードを書いてみた.ます,最初に記述すべき項目として,以下のものがある.
Import-Module C:\winPowerShell\UIAutomation\UIAutomation.dll
これは,UI Automation を利用することを PowerShell 側に知らせるコードである.後は自由に書くだけだが,筆者のように何も知らない人は調べるところから始まる.今回は,キー操作がメインとなるので,キーの一覧を探した.使いそうなものを以下に示しておく.
<#
   Left mouse button        LBUTTON = 0x01,
   Right mouse button       RBUTTON = 0x02,
   Control-break processing CANCEL = 0x03,
   BACKSPACE key            BACK = 0x08,
   TAB key                  TAB = 0x09,
   CLEAR key                CLEAR = 0x0C,
   ENTER key                RETURN = 0x0D,
   SHIFT key                SHIFT = 0x10,
   CTRL key                 CONTROL = 0x11,
   ALT key                  MENU = 0x12,
   PAUSE key                PAUSE = 0x13,
   CAPS LOCK key            CAPITAL = 0x14,
   ESC key                  ESCAPE = 0x1B,
   SPACEBAR                 SPACE = 0x20,
   PAGE UP key              PRIOR = 0x21,
   PAGE DOWN key            NEXT = 0x22,
   END key                  END = 0x23,
   HOME key                 HOME = 0x24,
   LEFT ARROW key           LEFT = 0x25,
   UP ARROW key             UP = 0x26,
   RIGHT ARROW key          RIGHT = 0x27,
   DOWN ARROW key           DOWN = 0x28,
   SELECT key               SELECT = 0x29,
   PRINT key                PRINT = 0x2A,
   EXECUTE key              EXECUTE = 0x2B,
   PRINT SCREEN key         SNAPSHOT = 0x2C,
   INS key                  INSERT = 0x2D,
   DEL key                  DELETE = 0x2E,
   HELP key                 HELP = 0x2F,
   0 key                    VK_0 = 0x30,
   1 key                    VK_1 = 0x31,
   2 key                    VK_2 = 0x32,
   3 key                    VK_3 = 0x33,
   4 key                    VK_4 = 0x34,
   5 key                    VK_5 = 0x35,
   6 key                    VK_6 = 0x36,
   7 key                    VK_7 = 0x37,
   8 key                    VK_8 = 0x38,
   9 key                    VK_9 = 0x39,
   A key                    VK_A = 0x41,
   B key                    VK_B = 0x42,
   C key                    VK_C = 0x43,
   D key                    VK_D = 0x44,
   E key                    VK_E = 0x45,
   F key                    VK_F = 0x46,
   G key                    VK_G = 0x47,
   H key                    VK_H = 0x48,
   I key                    VK_I = 0x49,
   J key                    VK_J = 0x4A,
   K key                    VK_K = 0x4B,
   L key                    VK_L = 0x4C,
   M key                    VK_M = 0x4D,
   N key                    VK_N = 0x4E,
   O key                    VK_O = 0x4F,
   P key                    VK_P = 0x50,
   Q key                    VK_Q = 0x51,
   R key                    VK_R = 0x52,
   S key                    VK_S = 0x53,
   T key                    VK_T = 0x54,
   U key                    VK_U = 0x55,
   V key                    VK_V = 0x56,
   W key                    VK_W = 0x57,
   X key                    VK_X = 0x58,
   Y key                    VK_Y = 0x59,
   Z key                    VK_Z = 0x5A,
   Left Windows key         LWIN = 0x5B,
   Right Windows key        RWIN = 0x5C,
   Applications key         APPS = 0x5D,
   Numeric keypad 0 key     NUMPAD0 = 0x60,
   Numeric keypad 1 key     NUMPAD1 = 0x61,
   Numeric keypad 2 key     NUMPAD2 = 0x62,
   Numeric keypad 3 key     NUMPAD3 = 0x63,
   Numeric keypad 4 key     NUMPAD4 = 0x64,
   Numeric keypad 5 key     NUMPAD5 = 0x65,
   Numeric keypad 6 key     NUMPAD6 = 0x66,
   Numeric keypad 7 key     NUMPAD7 = 0x67,
   Numeric keypad 8 key     NUMPAD8 = 0x68,
   Numeric keypad 9 key     NUMPAD9 = 0x69,
   Multiply key             MULTIPLY = 0x6A,
   Add key                  ADD = 0x6B,
   Separator key            SEPARATOR = 0x6C,
   Subtract key             SUBTRACT = 0x6D,
   Decimal key              DECIMAL = 0x6E,
   Divide key               DIVIDE = 0x6F,
   F1 key                   F1 = 0x70,
   F2 key                   F2 = 0x71,
   F3 key                   F3 = 0x72,
   F4 key                   F4 = 0x73,
   F5 key                   F5 = 0x74,
   F6 key                   F6 = 0x75,
   F7 key                   F7 = 0x76,
   F8 key                   F8 = 0x77,
   F9 key                   F9 = 0x78,
   F10 key                  F10 = 0x79,
   F11 key                  F11 = 0x7A,
   F12 key                  F12 = 0x7B,
   NUM LOCK key             NUMLOCK = 0x90,
   SCROLL LOCK key          SCROLL = 0x91,
#>
これは,実際に実装されているものらしい.これを利用しつつコードを書く.
パラメータの設定
まずは,パラメータの設定からはじめる.ここでは,ファイル名の末尾に連番の数字を振ってデータを識別する.
# データファイルがあるディレクトリパス
$dataPath = "C:\Users\...\dataDir"
# 画像を保存するディレクトリパス
$savePath = "C:\Users\...\imgDir"

# 起動するソフトウェア
$exePath = "C:\Users\...\hoge.exe";
# ファイル名の開始と終了
$startFileNum = 1;
$endFileNum = 500;
ソフトウェアの起動
次に,ソフトウェアを起動するコードを書く.ここでは,最大化して表示する.
########################################################
# 指定したパスにあるプログラムを起動し、最大化して表示 #
########################################################
$process = Start-Process $exePath -PassThru -windowstyle Maximized | Get-UiaWindow;
この「Start-Process」でプロセスを起動する.Get-UiaWindow は,起動したソフトウェアをアクティブにするものだという認識だ(細かいことは知らない).
対象とするデータを開く
そして,ソフトウェアから対象とするデータを開く.ここでは,「hoge001.dat」,「hoge002.dat」という風に名前がついているものとする.連番を $idx で指定する.また,「Alt → r → u」で読み込み画面が開くものとする(通常のソフトは Ctrl + O のはず,これが特殊なだけ).
# 対象のファイルを設定
$idx = 2; # 番号
$padNum = $idx.ToString("000");              # 0 詰め 3 桁の数値とする(2 なら 002, 10 なら 010)
$targetFile = "hogehoge" + $padNum + ".dat"; # 開くファイル
$imgFile = "foo" + $padNum + ".png";         # 保存するファイル

# ここでは,Alt を押した後,r → u の順でキーを押すと,開く画面が出る
$process.Keyboard.KeyPress([WindowsInput.Native.VirtualKeyCode]::MENU) | Out-Null; # Alt キーを押す
$process.Keyboard.KeyPress([WindowsInput.Native.VirtualKeyCode]::VK_R) | Out-Null; # r キーを押す
$process.Keyboard.KeyPress([WindowsInput.Native.VirtualKeyCode]::VK_U) | Out-Null; # u キーを押す
おなじみの「開く」という画面が出る.ここでは,$dataPath で指定したパスを入力し,対象とするファイルを開く. まず,「開く」という画面をアクティブにする.ここで,「UIAutomationSpy.exe」を使用した.アクティブにするには,
$openWnd = Get-UiaWindow -Name '開く';
とすればよいらしい.代入する変数名は何でもよい.次に,パスを設定する.パスは,F4 キーを押して入力モードにし,Ctrl + A で全選択,Delete キーで削除,その後,$dataPath で指定したパスを書き込み,Enter を押すという流れになる.これを,コードで書くと以下のようになる.
$openWnd.Keyboard.KeyPress([WindowsInput.Native.VirtualKeyCode]::F4) | Out-Null;     # F4 キーを押す
$openWnd.Keyboard.KeyDown([WindowsInput.Native.VirtualKeyCode]::CONTROL) | Out-Null; # Ctrl キーを押し続ける(KeyDown に注目)
$openWnd.Keyboard.KeyPress([WindowsInput.Native.VirtualKeyCode]::VK_A) | Out-Null;   # A キーを押す(全選択状態となる)
$openWnd.Keyboard.KeyUp([WindowsInput.Native.VirtualKeyCode]::CONTROL) | Out-Null;   # Ctrl キーを離す(KeyUp)
$openWnd.Keyboard.KeyPress([WindowsInput.Native.VirtualKeyCode]::DELETE) | Out-Null; # Delete キーを押す(削除)
$openWnd.Keyboard.TypeText($dataPath) | Out-Null;                                    # テキストを書き込む
$openWnd.Keyboard.KeyPress([WindowsInput.Native.VirtualKeyCode]::RETURN) | Out-Null; # Enter を押す(RETURN として定義)
最後に,$targetFile で指定したファイル名を「ファイル名(N):」の欄に記入する必要がある.これが面倒であった.UIAutomationSpy.exe には,available patterns という項目があり,ここに,「ValuePattern」や「TextPattern」など,設定するための項目が記されている.今回は, http://uiautomation.codeplex.com/wikipage?title=Object%20model&referringTitle=Documentation で使い方を調べた.英語だが,何とかなる.その結果,以下のようなコードが書ける.
# リスト中にあるアイテムを選択して開く
$selectItem = $openWnd | Get-UiaEdit -Name 'ファイル名(N):';
$selectItem.Value = $targetFile;
$selectItem.Keyboard.KeyPress([WindowsInput.Native.VirtualKeyCode]::RETURN) | Out-Null;
# 0.5 秒停止
Start-Sleep -m 500
画面をクリップボードに保存
開いたデータの画面を PrintScreen でクリップボードにコピーする.
# 表示された データファイルを画像として保存
$process.Keyboard.KeyDown([WindowsInput.Native.VirtualKeyCode]::MENU) | Out-Null;      # Alt キーを押す
$process.Keyboard.KeyPress([WindowsInput.Native.VirtualKeyCode]::SNAPSHOT) | Out-Null; # PrintScreen キーを押す
$process.Keyboard.KeyUp([WindowsInput.Native.VirtualKeyCode]::MENU) | Out-Null;        # Alt キーを離す
ペイントに貼り付け
ペイントは「mspaint」で起動できるので,絶対パスの指定はいらない.
# ペイントを起動
$paintWnd = Start-Process mspaint -PassThru -windowstyle Maximized | Get-UiaWindow;
# クリップボードにある画像を貼り付ける
$paintWnd.Keyboard.KeyDown([WindowsInput.Native.VirtualKeyCode]::CONTROL) | Out-Null;
$paintWnd.Keyboard.KeyPress([WindowsInput.Native.VirtualKeyCode]::VK_V) | Out-Null;
$paintWnd.Keyboard.KeyUp([WindowsInput.Native.VirtualKeyCode]::CONTROL) | Out-Null;
名前を付けて保存
# 保存
$paintWnd.Keyboard.KeyDown([WindowsInput.Native.VirtualKeyCode]::CONTROL) | Out-Null;
$paintWnd.Keyboard.KeyPress([WindowsInput.Native.VirtualKeyCode]::VK_S) | Out-Null;
$paintWnd.Keyboard.KeyUp([WindowsInput.Native.VirtualKeyCode]::CONTROL) | Out-Null;

$openWnd = Get-UiaWindow -Name '名前を付けて保存';
$openWnd.Keyboard.KeyPress([WindowsInput.Native.VirtualKeyCode]::F4) | Out-Null;
$openWnd.Keyboard.KeyDown([WindowsInput.Native.VirtualKeyCode]::CONTROL) | Out-Null;
$openWnd.Keyboard.KeyPress([WindowsInput.Native.VirtualKeyCode]::VK_A) | Out-Null;
$openWnd.Keyboard.KeyUp([WindowsInput.Native.VirtualKeyCode]::CONTROL) | Out-Null;
$openWnd.Keyboard.KeyPress([WindowsInput.Native.VirtualKeyCode]::DELETE) | Out-Null;
$openWnd.Keyboard.TypeText($savePath) | Out-Null;
$openWnd.Keyboard.KeyPress([WindowsInput.Native.VirtualKeyCode]::RETURN) | Out-Null;

$saveProcess = $openWnd | Get-UiaEdit -Name 'ファイル名:'
$saveProcess.Value = $imgFile;
$saveProcess.Keyboard.KeyPress([WindowsInput.Native.VirtualKeyCode]::RETURN) | Out-Null;

# ペイントを閉じる
$paintWnd.Keyboard.KeyPress([WindowsInput.Native.VirtualKeyCode]::MENU) | Out-Null;
$paintWnd.Keyboard.KeyPress([WindowsInput.Native.VirtualKeyCode]::VK_F) | Out-Null;
$paintWnd.Keyboard.KeyPress([WindowsInput.Native.VirtualKeyCode]::VK_X) | Out-Null;
# 0.5 秒停止
Start-Sleep -m 500
スクリプト全体
以上のスクリプトを for 文を用いてループ処理にかければよい.
Import-Module C:\winPowerShell\UIAutomation\UIAutomation.dll

# データファイルがあるディレクトリパス
$dataPath = "C:\Users\...\dataDir"
# 画像を保存するディレクトリパス
$savePath = "C:\Users\...\imgDir"

# 起動するソフトウェア
$exePath = "C:\Users\...\hoge.exe";
# ファイル名の開始と終了
$startFileNum = 1;
$endFileNum = 500;

########################################################
# 指定したパスにあるプログラムを起動し、最大化して表示 #
########################################################
$process = Start-Process $exePath -PassThru -windowstyle Maximized | Get-UiaWindow;

# 対象のファイルを設定
for ($idx = $startFileNum ; $idx -le $endFileNum ; $idx++)
{
    $padNum = $idx.ToString("000");              # 0 詰め 3 桁の数値とする(2 なら 002, 10 なら 010)
    $targetFile = "hogehoge" + $padNum + ".dat"; # 開くファイル
    $imgFile = "foo" + $padNum + ".png";         # 保存するファイル

    # ここでは,Alt を押した後,r → u の順でキーを押すと,開く画面が出る
    $process.Keyboard.KeyPress([WindowsInput.Native.VirtualKeyCode]::MENU) | Out-Null; # Alt キーを押す
    $process.Keyboard.KeyPress([WindowsInput.Native.VirtualKeyCode]::VK_R) | Out-Null; # r キーを押す
    $process.Keyboard.KeyPress([WindowsInput.Native.VirtualKeyCode]::VK_U) | Out-Null; # u キーを押す

    $openWnd = Get-UiaWindow -Name '開く';
    $openWnd.Keyboard.KeyPress([WindowsInput.Native.VirtualKeyCode]::F4) | Out-Null;     # F4 キーを押す
    $openWnd.Keyboard.KeyDown([WindowsInput.Native.VirtualKeyCode]::CONTROL) | Out-Null; # Ctrl キーを押し続ける(KeyDown に注目)
    $openWnd.Keyboard.KeyPress([WindowsInput.Native.VirtualKeyCode]::VK_A) | Out-Null;   # A キーを押す(全選択状態となる)
    $openWnd.Keyboard.KeyUp([WindowsInput.Native.VirtualKeyCode]::CONTROL) | Out-Null;   # Ctrl キーを離す(KeyUp)
    $openWnd.Keyboard.KeyPress([WindowsInput.Native.VirtualKeyCode]::DELETE) | Out-Null; # Delete キーを押す(削除)
    $openWnd.Keyboard.TypeText($dataPath) | Out-Null;                                    # テキストを書き込む
    $openWnd.Keyboard.KeyPress([WindowsInput.Native.VirtualKeyCode]::RETURN) | Out-Null; # Enter を押す(RETURN として定義)

    # リスト中にあるアイテムを選択して開く
    $selectItem = $openWnd | Get-UiaEdit -Name 'ファイル名(N):';
    $selectItem.Value = $targetFile;
    $selectItem.Keyboard.KeyPress([WindowsInput.Native.VirtualKeyCode]::RETURN) | Out-Null;
    # 0.5 秒停止
    Start-Sleep -m 500


    # 表示された データファイルを画像として保存
    $process.Keyboard.KeyDown([WindowsInput.Native.VirtualKeyCode]::MENU) | Out-Null;      # Alt キーを押す
    $process.Keyboard.KeyPress([WindowsInput.Native.VirtualKeyCode]::SNAPSHOT) | Out-Null; # PrintScreen キーを押す
    $process.Keyboard.KeyUp([WindowsInput.Native.VirtualKeyCode]::MENU) | Out-Null;        # Alt キーを離す


    # ペイントを起動
    $paintWnd = Start-Process mspaint -PassThru -windowstyle Maximized | Get-UiaWindow;
    # クリップボードにある画像を貼り付ける
    $paintWnd.Keyboard.KeyDown([WindowsInput.Native.VirtualKeyCode]::CONTROL) | Out-Null;
    $paintWnd.Keyboard.KeyPress([WindowsInput.Native.VirtualKeyCode]::VK_V) | Out-Null;
    $paintWnd.Keyboard.KeyUp([WindowsInput.Native.VirtualKeyCode]::CONTROL) | Out-Null;


    # 保存
    $paintWnd.Keyboard.KeyDown([WindowsInput.Native.VirtualKeyCode]::CONTROL) | Out-Null;
    $paintWnd.Keyboard.KeyPress([WindowsInput.Native.VirtualKeyCode]::VK_S) | Out-Null;
    $paintWnd.Keyboard.KeyUp([WindowsInput.Native.VirtualKeyCode]::CONTROL) | Out-Null;

    $openWnd = Get-UiaWindow -Name '名前を付けて保存';
    $openWnd.Keyboard.KeyPress([WindowsInput.Native.VirtualKeyCode]::F4) | Out-Null;
    $openWnd.Keyboard.KeyDown([WindowsInput.Native.VirtualKeyCode]::CONTROL) | Out-Null;
    $openWnd.Keyboard.KeyPress([WindowsInput.Native.VirtualKeyCode]::VK_A) | Out-Null;
    $openWnd.Keyboard.KeyUp([WindowsInput.Native.VirtualKeyCode]::CONTROL) | Out-Null;
    $openWnd.Keyboard.KeyPress([WindowsInput.Native.VirtualKeyCode]::DELETE) | Out-Null;
    $openWnd.Keyboard.TypeText($savePath) | Out-Null;
    $openWnd.Keyboard.KeyPress([WindowsInput.Native.VirtualKeyCode]::RETURN) | Out-Null;

    $saveProcess = $openWnd | Get-UiaEdit -Name 'ファイル名:'
    $saveProcess.Value = $imgFile;
    $saveProcess.Keyboard.KeyPress([WindowsInput.Native.VirtualKeyCode]::RETURN) | Out-Null;

    # ペイントを閉じる
    $paintWnd.Keyboard.KeyPress([WindowsInput.Native.VirtualKeyCode]::MENU) | Out-Null;
    $paintWnd.Keyboard.KeyPress([WindowsInput.Native.VirtualKeyCode]::VK_F) | Out-Null;
    $paintWnd.Keyboard.KeyPress([WindowsInput.Native.VirtualKeyCode]::VK_X) | Out-Null;
    # 0.5 秒停止
    Start-Sleep -m 500
}
これで,スクリプトが完成した.これを,guiAuto.sp1 とでも命名し,適当なディレクトリに保存する.その後,Windows PowerShell ISE を起動し,「(ファイルがあるパス)\guiAuto.sp1」とするとスクリプトが走る.
今後
今回は,調べつつただ書いただけのものができた.関数も使えるらしいので,次やるときは,関数を利用して,機能ごとに分けたものを作成したい.
C 言語による C 言語ファイル操作
どうも,筆者です.
今回は,C 言語を用いて,C 言語ファイルの簡易的な編集を行う.プログラムの勉強であり,実用性は皆無である.
目的
ここでは,C 言語のソースコードを読み込んで,コメントとそれ以外のコードに分けるという操作を行う. ここで,
- ソースコード内のタブは読み飛ばす.
- スペースは保持する.
- コメントは,そのまま出力する.
- コメント以外のコードは,指定した文字列以内に収まるように,出力する.この時,改行コードは無視する.
という条件で処理を行う.すなわち,ある程度決まった長さで,コードを区切り,出力するプログラムとなる.
サンプル
今回は,楕円の中心,長軸の長さ,短軸の長さ,回転角の情報を読み取り,構造体に代入するというプログラムを例に,出力結果を示す.
void readPhantom(char *fileName, int numberOfPhantoms, PHANTOM *phantom, int *result){ FILE *fp; int iCnt; double paramReal[5]; if(*result < 0){ *result = -1; } else if(NULL == (fp = fopen(fileName, "r"))){ fprintf(stderr, "%s can't open\n", fileName); *result = -1; } else{ *result = 1; for(iCnt = 0; iCnt < numberOfPhantoms; iCnt++){ if( fscanf(fp, "%lf %lf %lf %lf %lf", ¶mReal[0], ¶mReal[1], ¶mReal[2], ¶mReal[3], ¶mReal[4]) != 5 ){ fprintf(stderr, "%s: format is illegal\n", fileName); *result = -1; iCnt = numberOfPhantoms; } else{ phantom[iCnt].x0 = paramReal[0]; phantom[iCnt].y0 = paramReal[1]; phantom[iCnt].A = paramReal[2]; phantom[iCnt].B = paramReal[3]; phantom[iCnt].alpha = paramReal[4]; } } fclose(fp); } }
これをプログラムに投げると,
void readPhantom(char *fileName, int numberOfPhantoms, PHANTOM *phantom, int *result){FILE *fp;int iCnt;double paramReal[5];if(*result < 0){*result = -1;}else if(NULL == (fp = fopen(fileName, "r"))){fprintf(stderr, "%s can't open\n", fileName);*result = -1;}else{*result = 1;for(iCnt = 0; iCnt < numberOfPhantoms; iCnt++){if(fscanf(fp, "%lf %lf %lf %lf %lf", ¶mReal[0], ¶mReal[1], ¶mReal[2], ¶mReal[3], ¶mReal[4]) != 5){fprintf(stderr, "%s: format is illegal\n", fileName);*result = -1;iCnt = numberOfPhantoms;}else{phantom[iCnt].x0 = paramReal[0];phantom[iCnt].y0 = paramReal[1];phantom[iCnt].A = paramReal[2];phantom[iCnt].B = paramReal[3];phantom[iCnt].alpha = paramReal[4];}}fclose(fp);}}
こうなる.もちろん,コンパイルもできる.
プログラム
たいした処理はしていないが,プログラムがあるので,載せておく.
#include<stdio.h>
#include<stdlib.h>
#define MAX_STRING_LENGTH (128)

typedef unsigned char UI1;

void printString(int iNum, char sz_buf[]);

int main(void){
    int iCnt, iDummy;
    char chReadChar, chComment;
    char sz_buf[MAX_STRING_LENGTH];
    chReadChar = chComment = 0;
    iCnt = iDummy = 0;

    while(EOF != scanf("%c", &chReadChar)){
        /* ヘッダーの出力 */
        if('#' == chReadChar){
            if(iCnt > 0){
                sz_buf[iCnt] = '\0';
                printString(iCnt, sz_buf);
                printf("\n");
                iCnt = 0;
            }

            /* # から始まるものは,改行が出力するまで書き出す */
            while('\n' != chReadChar){
                printf("%c", chReadChar);
                iDummy = scanf("%c", &chReadChar);
            }
            printf("\n");
            continue;
        }

        /* コメントの判定 */
        if('/' == chReadChar){
            iDummy = scanf("%c", &chReadChar);

            if(('*' != chReadChar) && ('/' != chReadChar)){
                if(iCnt + 2 >= (int)MAX_STRING_LENGTH){
                    sz_buf[iCnt] = '\0';
                    printString(iCnt, sz_buf);
                    iCnt = 0;
                }
                sz_buf[iCnt++] = '/';
                sz_buf[iCnt++] = chReadChar;
            }
            else{
                /* 複数行コメントの場合 */
                sz_buf[iCnt] = '\0';
                printString(iCnt, sz_buf);
                printf("\n");
                iCnt = 0;

                if('*' == chReadChar){
                    printf("/");
                    printf("*");
                    chComment = 1;

                    while(1 == chComment){
                        iDummy = scanf("%c", &chReadChar);
                        if('\t' == chReadChar){
                            chReadChar = ' ';
                        }
                        printf("%c", chReadChar);

                        if('*' == chReadChar){
                            iDummy = scanf("%c", &chReadChar);
                            if('\t' == chReadChar){
                                chReadChar = ' ';
                            }
                            printf("%c", chReadChar);

                            if('/' == chReadChar){
                                chComment = 0;
                                printf("\n");
                            }
                        }
                    }
                }
                else{
                    /* 1 行コメントの場合 */
                    printf("//");
                    iDummy = scanf("%c", &chReadChar);
                    while('\n' != chReadChar){
                        printf("%c", chReadChar);
                        iDummy = scanf("%c", &chReadChar);
                    }
                    printf("\n");
                }

            }
        }
        else if('"' == chReadChar){
            sz_buf[iCnt] = '\0';
            printString(iCnt, sz_buf);
            iCnt = 0;

            printf("%c", chReadChar);
            iDummy = scanf("%c", &chReadChar);
            while('"' != chReadChar){
                printf("%c", chReadChar);
                iDummy = scanf("%c", &chReadChar);
            }
            printf("%c", chReadChar);
        }
        else{
            /* 改行文字とタブは読み飛ばす */
            if(('\n' == chReadChar) || ('\t' == chReadChar)){
                continue;
            }
            /* NULL文字を挿入し,文字列を出力 */
            if(iCnt + 2 >= (int)MAX_STRING_LENGTH){
                sz_buf[iCnt] = '\0';
                printString(iCnt, sz_buf);
                iCnt = 0;
            }
            /* 読み込んだ文字列を格納 */
            sz_buf[iCnt++] = chReadChar;
        }
    }
    /* 残った文字列を出力 */
    sz_buf[iCnt] = '\0';
    printf("%s\n", sz_buf);
    iCnt = iDummy;

    return 0;
}

void printString(int iNum, char sz_buf[]){
    int iCnt, iSpaceCnt, isSpacePoint;
    iSpaceCnt = 0;

    /* スペースの数を探索 */
    for(iCnt = 0; iCnt < iNum - 1; iCnt++){
        if(' ' == sz_buf[iCnt]){
            iSpaceCnt++;
            isSpacePoint = iCnt;
        }
    }
    /* スペースが 1 つ以上ある場合 */
    if(iSpaceCnt > 1){
        /* 最後の文字だけ別に出力(途中で文字が切れるのを防ぐため) */
        /*
           int iCnt, iSpaceCnt, isSpacePoint;for(iCnt = 0; iCnt < iNum - 1; iCnt++){if(' ' == sz_bu
           f[iCnt]){iSpaceCnt++;isSpacePoint = iCnt;}}
           とならないようにするため(sz_bu という変数として認識される)
       */
        sz_buf[isSpacePoint] = '\0';
        printf("%s\n", sz_buf);
        printf("%s", &sz_buf[isSpacePoint + 1]);
    }
    /* スペースが 1 つの場合 */
    else{
        /* そのまま出力 */
        printf("%s", sz_buf);
    }

    return;
}
実験
ここでは,前回作成した CSV ファイルを読み出すプログラムを入力し,出力を確認する.まず,ものとプログラムは,以下のようになっている.前回のものをくっつけただけである.
#include<stdio.h>
#include<stdlib.h>

typedef enum {
    RETURN_OK = 0,
    ARGUMENT_ERROR,
    FILE_OPEN_ERROR,
    MALLOC_ERROR
} RETURN_TYPE;

/*
   iCountRowCol: 行数と列数をカウントする

   char *pszFileName:   読み込むファイル名
   unsigned int *piRow: 行数
   unsigned int *piCol: 列数

   return: 正常終了 -> 0
           異常終了 -> 0 以外
 */
int iCountRowCol(char *pszFileName, unsigned int *puiRow, unsigned int *puiCol){
    FILE *prFile;
    int iRet;
    unsigned int uiRow, uiCol;
    char chData;
    iRet = RETURN_OK;

    /* 引数のチェック */
    if((NULL == pszFileName) || (NULL == puiRow) || (NULL == puiCol)){
        fprintf(stderr, "argument error\n");
        iRet = ARGUMENT_ERROR;
        goto EXIT_COUNT_ROWCOL;
    }
    else{
        *puiRow = *puiCol = 0;
    }
    if(NULL == (prFile = fopen(pszFileName, "r"))){
        fprintf(stderr, "Error: %s cannot open\n", pszFileName);
        iRet = FILE_OPEN_ERROR;
        goto EXIT_COUNT_ROWCOL;
    }
    uiRow = uiCol = 0;

    while(EOF != fscanf(prFile, "%c", &chData)){
        /* カンマの場合 */
        if(',' == chData){
            uiCol++;
        }
        /* 改行コードの場合 */
        if('\n' == chData){
            uiCol++;
            uiRow++;
        }
    }
    uiCol /= uiRow;

    *puiRow = uiRow;
    *puiCol = uiCol;
    fclose(prFile);

EXIT_COUNT_ROWCOL:
    return iRet;
}


/*
   iMallocInt:          int 型の malloc を行う

   unsigned int uiSize: 確保するサイズ
   int **ppiArray:      確保先のアドレス

   return: 正常終了 -> 0
           異常終了 -> 0 以外
*/
int iMallocInt(unsigned int uiSize, int **ppiArray){
    unsigned int uiCnt;
    int iRet;
    iRet = RETURN_OK;

    /* 引数チェック */
    if(NULL == ppiArray){
        iRet = ARGUMENT_ERROR;
        goto EXIT_MALLOC_INT;
    }
    /* malloc */
    if(NULL == (*ppiArray = (int *)malloc(sizeof(int) * uiSize))){
        fprintf(stderr, "malloc error\n");
        iRet = MALLOC_ERROR;
        goto EXIT_MALLOC_INT;
    }
    else{
        for(uiCnt = 0; uiCnt < uiSize; uiCnt++){
            (*ppiArray)[uiCnt] = 0;
        }
    }

EXIT_MALLOC_INT:
    return iRet;
}

/*
   freeData: 確保した領域を開放する

   void *pvData: 確保した領域の先頭アドレス
*/
void freeData(void *pvData){
    if(NULL != pvData){
        free(pvData);
    }

    return;
}

/*
   iReadData: データの読み込み

   char *pszFileName:  読み込むファイル名
   unsigned int uiRow: ファイルの行数
   unsigned int uiCol: ファイルの列数
   int *piArray:       データの格納先

   return: 正常終了 -> 0
           異常終了 -> 0 以外
*/
int iReadData(char *pszFileName, unsigned int uiRow, unsigned int uiCol, int *piArray){
    FILE *prFile;
    char chData;
    int iRet;
    unsigned int uiCntRow, uiCntCol, uiCharCnt;
    char achInputDataList[11];
    iRet = RETURN_OK;

    /* 引数のチェック */
    if(NULL == pszFileName){
        iRet = ARGUMENT_ERROR;
        goto EXIT_READ_DATA;
    }

    /* ファイルオープン */
    if(NULL == (prFile = fopen(pszFileName, "r"))){
        fprintf(stderr, "Error: %s cannot open\n", pszFileName);
        iRet = FILE_OPEN_ERROR;
        goto EXIT_READ_DATA;
    }

    /* ファイルの読み込み */
    for(uiCntRow = 0; uiCntRow < uiRow; uiCntRow++){
        for(uiCntCol = 0; uiCntCol < uiCol; uiCntCol++){
            uiCharCnt = 0;
            achInputDataList[0] = '\0';

            /* 1 文字ずつ読み込む  */
            while(EOF != fscanf(prFile, "%c", &chData)){
                /* 「,」または「\n」が来た場合,ループを抜ける */
                if((',' == chData) || ('\n' == chData)){
                    break;
                }

                /* 今回は,数値の部分だけ保存 */
                if(((int)'0' <= (int)chData) && ((int)chData <= (int)'9')){
                    achInputDataList[uiCharCnt++] = chData;
                }
            }
            achInputDataList[uiCharCnt] = '\0';
            piArray[uiCntRow * uiCol + uiCntCol] = atoi(achInputDataList);
        }
    }
    fclose(prFile);

EXIT_READ_DATA:
    return iRet;
}

/*
   iReadCSVFile: CSV ファイルからデータを読み込む

   char *pszFileName:   読み込むファイル名
   unsigned int *piRow: 行数
   unsigned int *piCol: 列数
   int **ppiArray:      確保先のアドレス

   return: 正常終了 -> 0
           異常終了 -> 0 以外
*/
int iReadCSVFile(char *pszFileName, unsigned int *puiRow, unsigned int *puiCol, int **ppiArray){
    int iRet;
    unsigned int uiSize = 0;

    iRet = iCountRowCol(pszFileName, puiRow, puiCol);
    if(RETURN_OK != iRet){
        fprintf(stderr, "Error: iCountRowCol\n");
        goto EXIT_READ_CSV_FILE;
    }

    uiSize = (*puiRow) * (*puiCol);
    iRet = iMallocInt(uiSize, ppiArray);
    if(RETURN_OK != iRet){
        fprintf(stderr, "Error: iMallocInt\n");
        goto EXIT_READ_CSV_FILE;
    }

    iRet = iReadData(pszFileName, *puiRow, *puiCol, *ppiArray);
    if(RETURN_OK != iRet){
        fprintf(stderr, "Error: iReadData\n");
        goto EXIT_READ_CSV_FILE;
    }

EXIT_READ_CSV_FILE:
    return iRet;
}

void printData(unsigned int uiRow, unsigned int uiCol, int *piArray){
    unsigned int uiCntRow, uiCntCol;

    for(uiCntRow = 0; uiCntRow < uiRow; uiCntRow++){
        for(uiCntCol = 0; uiCntCol < uiCol; uiCntCol++){
            printf("%d ", piArray[uiCntRow * uiCol + uiCntCol]);
        }
        printf("\n");
    }
}

int main(int iArgCnt, char **ppchArgVec){
    int iRet;
    unsigned int uiRow, uiCol;
    int *piArray;

    if(iArgCnt == 2){
        iRet = iReadCSVFile(ppchArgVec[1], &uiRow, &uiCol, &piArray);

        if(iRet == RETURN_OK){
            printData(uiRow, uiCol, piArray);
            freeData((void *)piArray);
        }
    }

    return 0;
}
次に,プログラムにより出力したコードを示す.
#include<stdio.h>
#include<stdlib.h>
typedef enum {RETURN_OK = 0,ARGUMENT_ERROR,FILE_OPEN_ERROR,MALLOC_ERROR}
RETURN_TYPE;
/*
 iCountRowCol: 行数と列数をカウントする

 char *pszFileName:   読み込むファイル名
 unsigned int *piRow: 行数
 unsigned int *piCol: 列数

 return: 正常終了 -> 0
         異常終了 -> 0 以外
 */
int iCountRowCol(char *pszFileName, unsigned int *puiRow, unsigned int *puiCol){FILE *prFile;int iRet;unsigned int uiRow,
uiCol;char chData;iRet =
RETURN_OK;
/* 引数のチェック */
if((NULL == pszFileName) || (NULL == puiRow) || (NULL ==
puiCol)){fprintf(stderr, "argument error\n");iRet = ARGUMENT_ERROR;goto EXIT_COUNT_ROWCOL;}else{*puiRow = *puiCol = 0;}if(NULL == (prFile =
fopen(pszFileName, "r"))){fprintf(stderr, "Error: %s cannot open\n", pszFileName);iRet = FILE_OPEN_ERROR;goto EXIT_COUNT_ROWCOL;}uiRow = uiCol = 0;while(EOF !=
fscanf(prFile, "%c", &chData)){
/* カンマの場合 */
if(',' ==
chData){uiCol++;}
/* 改行コードの場合 */
if('\n' == chData){uiCol++;uiRow++;}}uiCol /= uiRow;*puiRow = uiRow;*puiCol = uiCol;fclose(prFile);EXIT_COUNT_ROWCOL:return
iRet;}
/*
 iMallocInt:          int 型の malloc を行う

 unsigned int uiSize: 確保するサイズ
 int **ppiArray:      確保先のアドレス

 return: 正常終了 -> 0
         異常終了 -> 0 以外
*/
int iMallocInt(unsigned int uiSize, int **ppiArray){unsigned int uiCnt;int iRet;iRet =
RETURN_OK;
/* 引数チェック */
if(NULL == ppiArray){iRet = ARGUMENT_ERROR;goto
EXIT_MALLOC_INT;}
/* malloc */
if(NULL == (*ppiArray = (int *)malloc(sizeof(int) *
uiSize))){fprintf(stderr, "malloc error\n");iRet = MALLOC_ERROR;goto EXIT_MALLOC_INT;}else{for(uiCnt = 0; uiCnt < uiSize; uiCnt++){(*ppiArray)[uiCnt] =
0;}}EXIT_MALLOC_INT:return iRet;}
/*
 freeData: 確保した領域を開放する

 void *pvData: 確保した領域の先頭アドレス
*/
void freeData(void *pvData){if(NULL !=
pvData){free(pvData);}return;}
/*
 iReadData: データの読み込み

 char *pszFileName:  読み込むファイル名
 unsigned int uiRow: ファイルの行数
 unsigned int uiCol: ファイルの列数
 int *piArray:       データの格納先

 return: 正常終了 -> 0
         異常終了 -> 0 以外
*/
int iReadData(char *pszFileName, unsigned int uiRow, unsigned int uiCol, int *piArray){FILE *prFile;char chData;int
iRet;unsigned int uiCntRow, uiCntCol, uiCharCnt;char achInputDataList[11];iRet =
RETURN_OK;
/* 引数のチェック */
if(NULL == pszFileName){iRet = ARGUMENT_ERROR;goto
EXIT_READ_DATA;}
/* ファイルオープン */
if(NULL == (prFile =
fopen(pszFileName, "r"))){fprintf(stderr, "Error: %s cannot open\n", pszFileName);iRet = FILE_OPEN_ERROR;goto
EXIT_READ_DATA;}
/* ファイルの読み込み */
for(uiCntRow = 0; uiCntRow < uiRow; uiCntRow++){for(uiCntCol = 0; uiCntCol < uiCol; uiCntCol++){uiCharCnt =
0;achInputDataList[0] =
'\0';
/* 1 文字ずつ読み込む  */
while(EOF !=
fscanf(prFile, "%c", &chData)){
/* 「,」または「\n」が来た場合,ループを抜ける */
if((',' == chData) || ('\n' ==
chData)){break;}
/* 今回は,数値の部分だけ保存 */
if(((int)'0' <= (int)chData) && ((int)chData <= (int)'9')){achInputDataList[uiCharCnt++] =
chData;}}achInputDataList[uiCharCnt] = '\0';piArray[uiCntRow * uiCol + uiCntCol] = atoi(achInputDataList);}}fclose(prFile);EXIT_READ_DATA:return
iRet;}
/*
 iReadCSVFile: CSV ファイルからデータを読み込む

 char *pszFileName:   読み込むファイル名
 unsigned int *piRow: 行数
 unsigned int *piCol: 列数
 int **ppiArray:      確保先のアドレス

 return: 正常終了 -> 0
         異常終了 -> 0 以外
*/
int iReadCSVFile(char *pszFileName, unsigned int *puiRow, unsigned int *puiCol, int **ppiArray){int iRet;unsigned int uiSize
= 0;iRet = iCountRowCol(pszFileName, puiRow, puiCol);if(RETURN_OK !=
iRet){fprintf(stderr, "Error: iCountRowCol\n");goto EXIT_READ_CSV_FILE;}uiSize = (*puiRow) * (*puiCol);iRet = iMallocInt(uiSize, ppiArray);if(RETURN_OK !=
iRet){fprintf(stderr, "Error: iMallocInt\n");goto EXIT_READ_CSV_FILE;}iRet = iReadData(pszFileName, *puiRow, *puiCol, *ppiArray);if(RETURN_OK !=
iRet){fprintf(stderr, "Error: iReadData\n");goto EXIT_READ_CSV_FILE;}EXIT_READ_CSV_FILE:return iRet;}void printData(unsigned int uiRow, unsigned int uiCol, int
*piArray){unsigned int uiCntRow, uiCntCol;for(uiCntRow = 0; uiCntRow < uiRow; uiCntRow++){for(uiCntCol = 0; uiCntCol < uiCol;
uiCntCol++){printf("%d ", piArray[uiCntRow * uiCol +
uiCntCol]);}printf("\n");}}int main(int iArgCnt, char **ppchArgVec){int iRet;unsigned int uiRow, uiCol;int *piArray;if(iArgCnt == 2){iRet =
iReadCSVFile(ppchArgVec[1], &uiRow, &uiCol, &piArray);if(iRet == RETURN_OK){printData(uiRow, uiCol, piArray);freeData((void
*)piArray);}}return 0;}
少し読みにくいが,これでもちゃんとコンパイルがとおり,実行結果も一致する.次回何か書くことがあったら,もっと実用的なものを作成したい.
CSV ファイルを C 言語で読み込む
どうも,筆者です.
今回は,CSV ファイルを C 言語で読み込むことを考える.
考え方
カンマ(,)か改行コード(\n)が出てくるまで,データを char 型の配列に保持する.カンマ(,)か改行コード(\n)が出てきたら,atoi または,atof 関数で数値に変換する. この時,行数と列数が分からないので,一度ファイルの終端コード(EOF)が出てくるまで読み続ける.その後,先頭に戻って再度処理をするという流れになる.
プログラム
まず,戻り値の処理をするため,ヘッダに列挙型を定義する.
/* defineConstant.h */
#ifndef __DEFINECONSTANT_H__
#define __DEFINECONSTANT_H__

typedef enum {
    RETURN_OK = 0,
    ARGUMENT_ERROR,
    FILE_OPEN_ERROR,
    MALLOC_ERROR
} RETURN_TYPE;

#endif
次に,行数と列数をカウントするプログラムを作成する.
#include"defineConstant.h"
/*
   iCountRowCol: 行数と列数をカウントする

   char *pszFileName:   読み込むファイル名
   unsigned int *piRow: 行数
   unsigned int *piCol: 列数

   return: 正常終了 -> 0
           異常終了 -> 0 以外
 */
int iCountRowCol(char *pszFileName, unsigned int *puiRow, unsigned int *puiCol){
    FILE *prFile;
    int iRet;
    unsigned int uiRow, uiCol;
    char chData;
    iRet = RETURN_OK;

    /* 引数のチェック */
    if((NULL == pszFileName) || (NULL == puiRow) || (NULL == puiCol)){
        fprintf(stderr, "argument error\n");
        iRet = ARGUMENT_ERROR;
        goto EXIT_COUNT_ROWCOL;
    }
    else{
        *puiRow = *puiCol = 0;
    }
    if(NULL == (prFile = fopen(pszFileName, "r"))){
        fprintf(stderr, "Error: %s cannot open\n", pszFileName);
        iRet = FILE_OPEN_ERROR;
        goto EXIT_COUNT_ROWCOL;
    }
    uiRow = uiCol = 0;

    while(EOF != fscanf(prFile, "%c", &chData)){
        /* カンマの場合 */
        if(',' == chData){
            uiCol++;
        }
        /* 改行コードの場合 */
        if('\n' == chData){
            uiCol++;
            uiRow++;
        }
    }
    uiCol /= uiRow;

    *puiRow = uiRow;
    *puiCol = uiCol;
    fclose(prFile);

EXIT_COUNT_ROWCOL:
    return iRet;
}
その後,必要なサイズを malloc する関数を定義する.ここでは,int 型で確保する.同時に,領域を開放する関数も書く.
/*
   iMallocInt:          int 型の malloc を行う

   unsigned int uiSize: 確保するサイズ
   int **ppiArray:      確保先のアドレス

   return: 正常終了 -> 0
           異常終了 -> 0 以外
*/
int iMallocInt(unsigned int uiSize, int **ppiArray){
    unsigned int uiCnt;
    int iRet;
    iRet = RETURN_OK;

    /* 引数チェック */
    if(NULL == ppiArray){
        iRet = ARGUMENT_ERROR;
        goto EXIT_MALLOC_INT;
    }
    /* malloc */
    if(NULL == (*ppiArray = (int *)malloc(sizeof(int) * uiSize))){
        fprintf(stderr, "malloc error\n");
        iRet = MALLOC_ERROR;
        goto EXIT_MALLOC_INT;
    }
    else{
        for(uiCnt = 0; uiCnt < uiSize; uiCnt++){
            (*ppiArray)[uiCnt] = 0;
        }
    }

EXIT_MALLOC_INT:
    return iRet;
}

/*
   freeData: 確保した領域を開放する

   void *pvData: 確保した領域の先頭アドレス
*/
void freeData(void *pvData){
    if(NULL != pvData){
        free(pvData);
    }

    return;
}
最後に,データを解析し,読み込んでいく.
/*
   iReadData: データの読み込み

   char *pszFileName:  読み込むファイル名
   unsigned int uiRow: ファイルの行数
   unsigned int uiCol: ファイルの列数
   int *piArray:       データの格納先

   return: 正常終了 -> 0
           異常終了 -> 0 以外
*/
int iReadData(char *pszFileName, unsigned int uiRow, unsigned int uiCol, int *piArray){
    FILE *prFile;
    char chData;
    int iRet;
    unsigned int uiCntRow, uiCntCol, uiCharCnt;
    char achInputDataList[11];
    iRet = RETURN_OK;

    /* 引数のチェック */
    if(NULL == pszFileName){
        iRet = ARGUMENT_ERROR;
        goto EXIT_READ_DATA;
    }

    /* ファイルオープン */
    if(NULL == (prFile = fopen(pszFileName, "r"))){
        fprintf(stderr, "Error: %s cannot open\n", pszFileName);
        iRet = FILE_OPEN_ERROR;
        goto EXIT_READ_DATA;
    }

    /* ファイルの読み込み */
    for(uiCntRow = 0; uiCntRow < uiRow; uiCntRow++){
        for(uiCntCol = 0; uiCntCol < uiCol; uiCntCol++){
            uiCharCnt = 0;
            achInputDataList[0] = '\0';

            /* 1 文字ずつ読み込む  */
            while(EOF != fscanf(prFile, "%c", &chData)){
                /* 「,」または「\n」が来た場合,ループを抜ける */
                if((',' == chData) || ('\n' == chData)){
                    break;
                }

                /* 今回は,数値の部分だけ保存 */
                if(((int)'0' <= (int)chData) && ((int)chData <= (int)'9')){
                    achInputDataList[uiCharCnt++] = chData;
                }
            }
            achInputDataList[uiCharCnt] = '\0';
            piArray[uiCntRow * uiCol + uiCntCol] = atoi(achInputDataList);
        }
    }
    fclose(prFile);

EXIT_READ_DATA:
    return iRet;
}
これで,CSV ファイルからデータを読み込み,格納することができる.後は,これをまとめて行う関数を定義する.
/*
   iReadCSVFile: CSV ファイルからデータを読み込む

   char *pszFileName:   読み込むファイル名
   unsigned int *piRow: 行数
   unsigned int *piCol: 列数
   int **ppiArray:      確保先のアドレス

   return: 正常終了 -> 0
           異常終了 -> 0 以外
*/
int iReadCSVFile(char *pszFileName, unsigned int *puiRow, unsigned int *puiCol, int **ppiArray){
    int iRet;
    unsigned int uiSize = 0;

    iRet = iCountRowCol(pszFileName, puiRow, puiCol);
    if(RETURN_OK != iRet){
        fprintf(stderr, "Error: iCountRowCol\n");
        goto EXIT_READ_CSV_FILE;
    }

    uiSize = (*puiRow) * (*puiCol);
    iRet = iMallocInt(uiSize, ppiArray);
    if(RETURN_OK != iRet){
        fprintf(stderr, "Error: iMallocInt\n");
        goto EXIT_READ_CSV_FILE;
    }

    iRet = iReadData(pszFileName, *puiRow, *puiCol, *ppiArray);
    if(RETURN_OK != iRet){
        fprintf(stderr, "Error: iReadData\n");
        goto EXIT_READ_CSV_FILE;
    }

EXIT_READ_CSV_FILE:
    return iRet;
}
確認
このファイルを readCSVFile.c として保存し,正しく動作するか確認する.main 関数は,以下のようにした.
#include<stdio.h>
#include<stdlib.h>
#include"defineConstant.h"

extern int iReadCSVFile(char *pszFileName, unsigned int *puiRow, unsigned int *puiCol, int **ppiArray);
extern void freeData(void *pvData);
void printData(unsigned int uiRow, unsigned int uiCol, int *piArray);

int main(int iArgCnt, char **ppchArgVec){
    int iRet;
    unsigned int uiRow, uiCol;
    int *piArray;

    if(iArgCnt == 2){
        iRet = iReadCSVFile(ppchArgVec[1], &uiRow, &uiCol, &piArray);

        if(iRet == RETURN_OK){
            printData(uiRow, uiCol, piArray);
            freeData((void *)piArray);
        }
    }

    return 0;
}

void printData(unsigned int uiRow, unsigned int uiCol, int *piArray){
    unsigned int uiCntRow, uiCntCol;

    for(uiCntRow = 0; uiCntRow < uiRow; uiCntRow++){
        for(uiCntCol = 0; uiCntCol < uiCol; uiCntCol++){
            printf("%d ", piArray[uiCntRow * uiCol + uiCntCol]);
        }
        printf("\n");
    }
}
CSV ファイルは,以下のようなものを作成した.
01,02,03,04,05,06,07,08,09,10
11,12,13,14,15,16,17,18,19,20
21,22,23,24,25,26,27,28,29,30
31,32,33,34,35,36,37,38,39,40
41,42,43,44,45,46,47,48,49,50
51,52,53,54,55,56,57,58,59,60
61,62,63,64,65,66,67,68,69,70
71,72,73,74,75,76,77,78,79,80
81,82,83,84,85,86,87,88,89,90
91,92,93,94,95,96,97,98,99,100
実行結果は,以下のようになった.
1 2 3 4 5 6 7 8 9 10
11 12 13 14 15 16 17 18 19 20
21 22 23 24 25 26 27 28 29 30
31 32 33 34 35 36 37 38 39 40
41 42 43 44 45 46 47 48 49 50
51 52 53 54 55 56 57 58 59 60
61 62 63 64 65 66 67 68 69 70
71 72 73 74 75 76 77 78 79 80
81 82 83 84 85 86 87 88 89 90
91 92 93 94 95 96 97 98 99 100
正しく動作している.
楕円が存在する領域
どうも,筆者です.
楕円を覆う領域
今回は,有限個の楕円が平面状に散らばっている状況を考える.この状況において,すべての楕円を含む長方形領域の最小値を求める問題を解く. 図で示すと以下のような長方形領域を求めることになる.
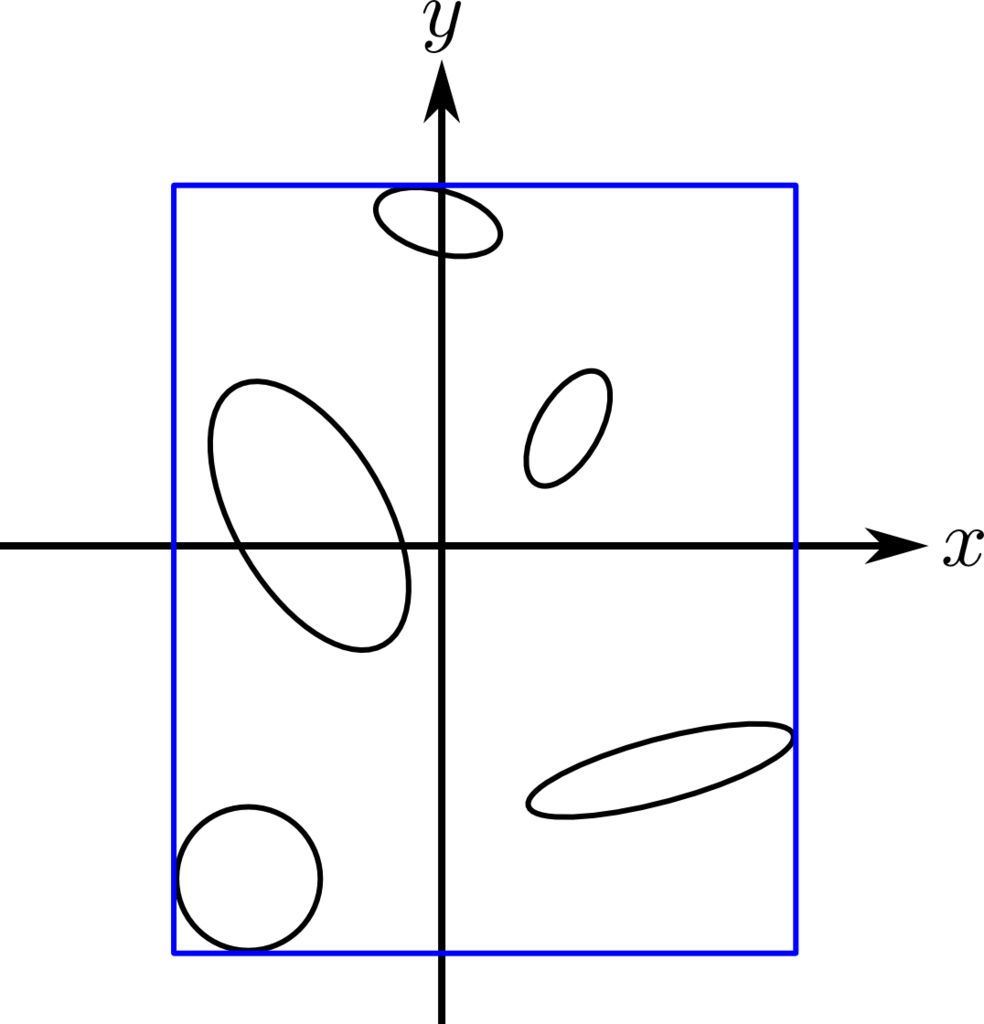
領域の計算方法
計算方法として,以下のような楕円ごとの長方形の領域を考えた.

この図において,楕円の方程式は,
で与えられる.ここで, である.また,媒介変数
を用いると,楕円上の点
は,
となる.
この時,楕円を だけ回転させた場合,移動後の点
は,回転行列を用いて,
となる.さらに,三角関数の合成を用いて,
と表せる.ここで,
である.
よって, がそれぞれ最大となる時が,求める長方形領域の半分の長さとなるので,
は,
となる.
C プログラム
後は,この結果をプログラムに落とすだけである.ここでは,以下のような図を考える.

この図のように,それぞれの楕円に外接する長方形を計算し,原点から最も遠くなる位置を求める.以下に,プログラムを示す.
これで,図に示した青色の領域を求めることができる.
関連記事のサムネイルを表示する
どうも,筆者です.
以前,ブログの見た目を変更しようと思い,関連記事を実装した.その際,サムネイル画像が表示されなかったが,先日,修正方法が記事になっていた.
こちらを参考に再度修正を行った.
ヘッダの修正
Java Script は,普段使わないので,間違えないように修正する.以下は,上記のサイトの一部引用である.
var title = el.find('title').text(); //ブログタイトル
var articleLink = el.find('link').attr('href'); //ブログタイトル
var overview = el.find('summary').text(); //ブログ概要
そして,記事を参考に,imgSrc を articleLink の下に挿入する.後で見たときに分かるように,ブログイメージとコメントを入れておいた.
var title = el.find('title').text(); //ブログタイトル
var articleLink = el.find('link').attr('href'); //ブログタイトル
var imgSrc = el.find('link[type="image/png"]').attr('href'); //ブログイメージ ←追加部分
var overview = el.find('summary').text(); //ブログ概要
最後に,html の部分をサイトの通り,書き換える.この部分は,サイトのものをそのままコピペした.
変更後
デザインの変更をした結果,以下のようになった.
修正したことで,問題なく動作しているようだ.良かった.